
Create Kaltura video from within Canvas (new recorder)
Kaltura allows faculty, students, and staff at Rutgers to create or upload videos to a streaming server, which makes sharing them easy for everyone. You could think of our Kaltura server as Rutgers’ own YouTube-like service.
Before you record a lecture for your course, review our tips about video lecture types and optimal video length.
To launch Kaltura and create new video with KalturaCapture from within Canvas:
- Log into Canvas and select My Kaltura Media. My Kaltura Media can be found as a tab in the Canvas left-hand, red global navigation bar.
- Click the “Add New” button at the top right of the screen
- Select “Kaltura Personal Capture”
- If this is the first time you’ve created a recording with Kaltura, you’ll need to download the KalturaCapture software
- If you’ve already installed KalturaCapture, wait a moment or two and it will launch automatically, or you will be prompted to open Kaltura Capture

- Select the icons of which items you’d like to record. By default, KalturaCapture will record your screen, webcam, and microphone (icons displayed in this order from left to right) if your computer is equipped with all of those things.
- Note: You can click on the icon itself to toggle the specific tool on or off (for instance, click on the camera to turn off the webcam). If you have multiple webcams, screens, or microphones available, you can click on the drop-down menu icon to the right of each icon to select which one you’d like to use. This could be particularly useful if you’re using a headset with a microphone and you don’t want to use the computer’s built-in microphone.
- When an icon is turned off, the icon will display as gray with a slash through it.
- Recording the full screen or only an area of the screen: You can choose to record your entire screen or only a specific portion. Click on the down-pointing caret to the right of the computer icon to select the appropriate option for your recording.
- Once you have made the selections to record your video, click the red circle Record button.
- You’ll get a 5-second countdown before the recording starts.
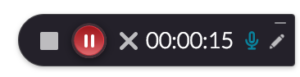 A timer will display in the bottom right-hand corner of your screen. This will also allow you to stop, pause, or cancel the recording.
- Click the gray square button to stop the recording. Select “Yes, Stop it” when asked if you are sure you’d like to stop this recording.
- A black box will appear with a thumbnail of the recording. You can hit the play button beneath the thumbnail if you’d like to preview the recording.
- Type the name of your new video under the “Title” option and click Upload to save it to the Kaltura streaming server.
- The video description and tags are not required.
- The video will now be stored on the Rutgers Kaltura server, visible from “My Kaltura Media” within Canvas. Sometimes, it can take a few minutes for the video to appear. If it doesn’t appear right away, try waiting five minutes and refreshing your browser.
- You may wish to add this video to the Kaltura Course Gallery, or you may wish to embed the video in Canvas.