
Record lecture on iPad
If you use an iPad, recording lectures on it can give you some interesting options. This article will review:
- setting up your iPad for recording
- recording a slideshow with narration
- adding live annotations during recording
- ending your recording & saving your video
- uploading your video to My Kaltura Media (to share with students)
Set up your iPad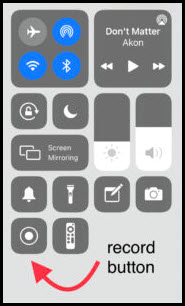
- If you haven’t before, add Screen Recording to your iPad Control Center
- from Settings on your iPad, select Control Center
- if Screen Recording does not appear under “Included Controls,” find it in the “More Controls” list and click the green + Add button
- now when you open Control Center, you’ll see the Record button
- You’ll probably want to record in landscape mode, and may wish to lock screen to avoid sudden reorientation of your screen
- To prevent notifications from featuring in your recording, enable Do Not Disturb on your iPad
- You can record from the built-in mic, but will get better audio quality with an external mic (even your earphone mic)
- Consider your content. If recording:
- a slideshow, try to break it up into shorter segments, under 10 minutes or so
- just a whiteboard, practice your annotating until you’re comfortable (the Notes app may work just fine for you)
- your face, using the Camera app, consider some best practices for talking-head video
Start and stop recording
- open the appropriate content (slideshow app, whiteboard app, camera app, etc.)
- from the top right of the screen, slide your finger down to open the Control Center
- tap and hold the Record button to show Screen Recording options
- tap the microphone button if necessary to turn on the microphone (red is ON)
- tap Start Recording
- during the 3-second countdown, tap outside of the Screen Recording box to return to Control Center, and again to return to your content
- when you seen the red recording icon at the top, you are now recording everything on your iPad screen, plus your voice
- to emphasize a spot on your screen: tap and hold on the screen to create a pointer (big red dot); it will disappear when you lift your finger
- to annotate on a PowerPoint slideshow: tap the top of your screen to make the Pencil icon appear; select to draw on screen—or tap the “pencil behind a gear” icon for more options
- to end the recording, tap the red recording button that will always show at the top of your screen
- the recorded video will be automatically saved in the Photos app on your iPad