
Getting started with VoiceThread in Canvas
First, decide what type of VoiceThread activities you’ll be adding to your course (see What is VoiceThread? for ideas):
- Watch and ask: students view a lecture you’ve prepared, optionally adding comments or questions
- Share and discuss: students upload new slide(s) and/or comments to a VT you’ve created
- Present: students or student groups assemble a VT with slides and recorded comments to share with classmates
You will first create a link in either Assignments or Modules, then you must make a choice in VoiceThread Setup.
Create link to VoiceThread
In your Canvas site, you can share a VoiceThread with your students either:
- From Assignments, for any graded activity (e.g., student comments on VT, student adds slide(s) to VT, student creates own or group VT)
- Click on “Assignments” from your course menu
- Create a new assignment (‘+Assignment’ button at top right of page)
- Name the assignment and write a description if you choose
- Select “External Tool” from the menu
- Select “VoiceThread” from the alphabetical list of tools
- Click the Save button at the bottom of your new assignment page, which will launch the VoiceThread Setup Page (see below)
 From Modules, for ungraded activity (e.g., student watches and optionally comments on a lecture you’ve prepared)
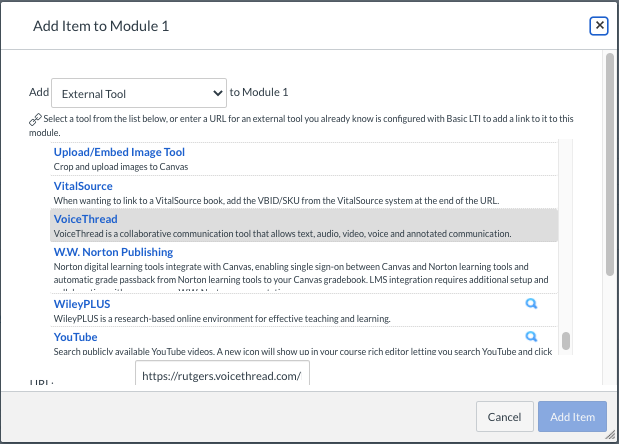
- Click on “Modules” from your course menu
- From the appropriate module, click the “Add Content” button (plus-sign icon at far right of Module title)
- Select “External Tool” from the menu
- Select “VoiceThread” from the alphabetical list of tools
- This will launch the VoiceThread Setup Page (see below)
Select student view in VoiceThread Setup
Important! Each time you link to VT from your Canvas site, you’ll first add the link to VT as an ‘external tool,’ (see above) then you’ll do the VoiceThread Setup, in which you select which view of VT the students should see. This step is critical! When you complete the steps to either ‘add to module’ or ‘add new assignment’ (above), you’ll see a screen where you must make one choice. Setup options are:
- Course view (give the students a view of all VTs for your course: to see VTs shared with the class by other students or to create their own VT to share)
- Individual VT (take the students VT you’ve created: to watch, comment on, and/or add slides to)
- VT home (might be useful to you, the instructor, as an unpublished link from your first Module in Canvas; allows you to see all your VTs and add new, without going through an assignment, not generally useful to students)
- Assignment builder (buggy; not recommended)
Suggested initial setup for your Canvas site
- Add an unpublished link to VT Home in your first Canvas module, for your own convenience (see “from Modules” above); you can use this link to create new VTs, view all your VTs, copy VTs from your other classes, etc.
- Create your VT identity if you haven’t already
- Create your first VoiceThread to share with students (see How do I create a VoiceThread?)
- Create an initial assignment for your students to be sure they create their VT identities; this might be part of an “introduce yourself” activity (see How can I support my students in using VoiceThread in Canvas?)