
ClassLive: getting started (instructor)
ClassLive is the tool in eCollege that allows you to meet with your students, in real time, in an online environment. You can present with video, audio, and PowerPoint, a whiteboard, or other content from your computer. Students can ask contribute via text chat–or with audio and/or video if they have the equipment. By default, the entire session will be recorded, so students can review later.
- For immediate assistance with ClassLive in eCollege at Rutgers, call 848 260 2941.
- Additional documentation can be found from Rutgers COHLIT or Blackboard Collaborate (another name for the ClassLive product)
Considerations before starting
- If your students aren’t familiar with ClassLive, send them this Participant Get Started Guide, at least several days before your scheduled session
- You probably will need a webcam and mic (built in to most laptops)
- Preferred browser may change; current recommendation is Firefox on Windows or Mac
- If you haven’t used ClassLive recently…. You must have Java (helper software) installed and configured:
- From Firefox, check your Java version
- If necessary, update or install Java software from the same webpage [WARNING: during install, Java may try to install Yahoo toolbar. Do not agree to this!]
- You must now configure your computer to open .ed files with Java (this is a pain in the neck, but you just have to do it once)
Starting a ClassLive session
Start setting up at least 15 minutes before your session is scheduled for students; log into eCollege and enter your course site.
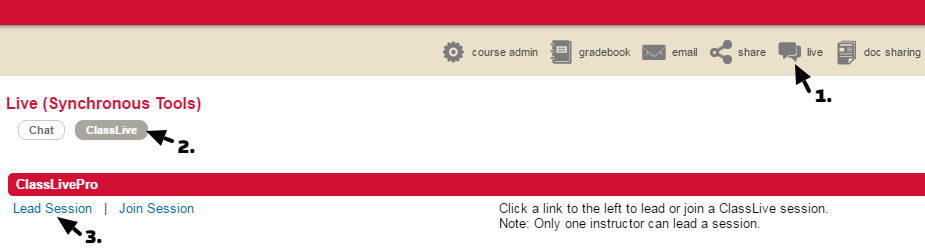
- From the toolbar along the top, click the “Live” tab
- Choose the “ClassLive” button towards the top of the page
- Click the “Lead Session” button (wait for small file to download, for Java to launch, for ClassLive session to open–click Run for Blackboard app)
- You’ll probably want to turn OFF the automatic recording while you’re setting up (top-right corner)
- Run the “audio setup wizard” each time you prepare to lead a session (make sure the correct ‘speakers’ or ‘headphones’ is selected)
- Allow simultaneous speakers: Tools menu, Audio, Maximum Simultaneous Users
- If you’re presenting with PowerPoint, you can upload the file now (may take a few minutes) from the “Load Content” button at the top right
- Click the Video button in the top-left panel to start your webcam (if desired)
- Click the Talk button under your video to start your mic
- Re-start the session recording, if you like, from the top-right corner
- Wait for your students to log in and appear in the Participants list… and start your lesson!
- When the session is complete, close it by choosing Exit from the File menu