
Tips for teaching via web conference
Here are some tips to help you get started teaching via a web conference. These are some of the first steps you’ll need to take when first launching the web conference, and best practices to follow thereafter. If you’re not sure how to complete some of the tasks mentioned in this guide, be sure to review our instructions on web conferences in Sakai & Canvas (both use the tool BigBlueButton):
Launching your web conference
- Inform students: Provide students with clear information about when you’ll be hosting the web conference beforehand, including the time and the date. Tell the students they can either click on the Meetings tool in Sakai or the Conferences tool in Canvas to find the web conference (depending
 on which system you’re using). You should also let them know before the web conference if you’d like them to be able to use a microphone (if they have one) or if it’s okay to join “audio only.”
 - Set up early: Start/join the conference at least ten minutes before the start time you’ve told students. This will give you a chance to upload any slides/documents (if necessary) and ensure everything is working properly.
- Upload documents: Upload any slides or documents to the conference before the students arrive so they’re ready to go.
- If using webcam, turn it on/test it out: If you need to adjust the view, you can before anyone arrives! Make sure you are not sitting directly in front of a light source or a messy background, if possible.
- Start recording: Click the “Start recording” button at the top-center of the BigBlueButton application to make sure your session is recorded for students who can’t attend.
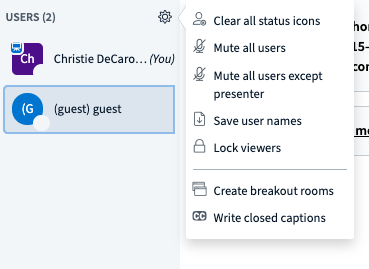
- Mute users: After the students have entered and you’re ready to start, you should mute all users to prevent audio feedback. Click the cog/gear icon in the lefthand column, to the right of “Users,” and choose Mute all users except for presenter. (see image on right)
- Confirm that users can hear you before you start: Before you get started, ask your students to confirm that they can hear you (they can type yes or no in the text chat) and if they can see your slides (if you’ve uploaded any).
Best practices during your web conference
- Webcams: Leave as many webcams off as possible to preserve bandwith. If you’d like students to share their webcams, ask students to turn their webcam on when speaking and turn it back off when finished.
- Recording: Remind students the session is being recorded in case anyone has difficulties.
- Questions & communication: Make clear the method by which you’d like students to communicate with you. Students can ask questions in the text chat, or they can unmute their microphone and ask a question using audio–you should let them know what you prefer. Especially in large classes, it may be best to ask students to type “I have a question” in the text chat, and ask them to wait for you to call on them. Then, they can unmute their microphone and ask their question.
- Text chat: Note that the text chat is not recorded, so if you reference questions or comments that are there, someone watching the recording will not be able to see them. If you are going to reference a question/comment in the text chat, you should be sure to read it aloud first: “John asked in the chat, ‘I’m not sure I understand how…'”
- Remember to end the conference in two places: First, end the conference in BigBlueButton; then go back to either Meetings in Sakai or Conferences in Canvas and click “end” there as well.